 |
|
Results |
|
|
|
|
When someone completes your form, the results are stored on the Formdesk server. You can view, modify and download these results. |
|
|
This document discusses the following:
|
|
|
Your results |
|
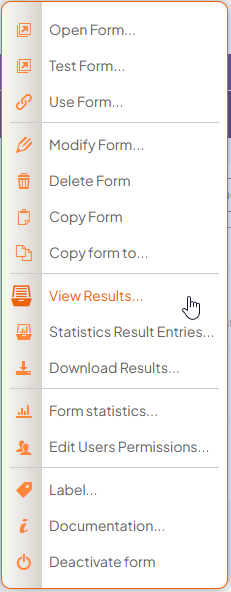
To examine your results, go to the form overview screen. Click the icon of the form and select 'View results'. |
 |
|
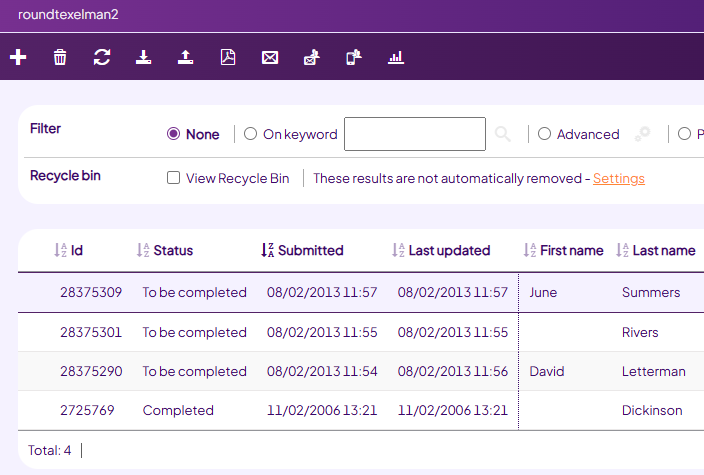
This will bring you to the summary where you'll find the answers given to the questions on your form. |
 |
|
|
The columns |
Your form results are divided into columns. The first columns contain 'system information'.
Other columns may become visible, depending on options enabled on your form:
|
- Entry ID, a unique number for each result.
- Source, the source of a result, only visible in case of multiple sources. Possible sources are “Account”, “Visitor”, “Import”, “Webservice (API)” and “Unknown”.
- Status, this may be “to be submitted”, “to be confirmed”, “to be verified”, “workflow to be completed”, “completed” and “cancelled”.
- Submitted, date and time of original submission of the form.
- Last updated, if the Visitor must be able to store form entries and finish later or Visitor must be able to maintain their own entries option is enabled.
- Ready declared, if the Visitor must be able to store form entries and finish later or Visitor must be able to maintain their own entries option is enabled.
- Visitor name, if the Visitor must be able to maintain their own entries option is enabled.
- Confirmed, if the Visitor must confirm entries option is enabled.
- Verified, date and time if the Email verification option is enabled.
- Order number, if the Submission order number option is enabled.
|
|
The questions are next. Each question has its own column. The questions are in the same order as they are on your form. |
|
|
The menu |
Click the icon next to the result to access the menu.
When applicable, you have the following options:
- Open entry
- Edit entry
- Delete entry
- Resend Notification message
- Resend Auto Responder
- Resend Workflow messages
- Change status to "to submit"
- Change status to "start workflow" (if applicable)
- Change status to "completed"
|
|
|
Open / edit a submitted form |
To open or edit a result, click the icon of the result and select 'Open entry' to view the result or 'Edit entry' to modify. You can also double-click the result line to open an entry. Now you can use the pencil icon in the toolbar to edit the completed form. At the bottom of the form you will find at least the following buttons:
- Save: This will only save the modification that you made.
- Save + Send: This is actually the normal send button. This means that the entire post submission procedure that normally is executed after the form is sent, will be executed. Email messages may be sent out, the status may be update, an order number may be assigned etc.
|
|
|
Change status |
Using the menu, you can change the status of an entry to one of the following:
to be submitted
start workflow (if workflow messages have been setup)
completed When the status is put back all data regarding the current status and intermediate statuses are cleared.
To be submitted: The filled-in form needs to be re-submitted. A link to the filled-in form is shown, that can be used to change form and re-send.
Workflow to be completed: The workflow will be started (again). The email messages are sent.
Completed: The form has been completed. The email messages are sent. |
|
|
Filters |
|
On the upper part of the Results summary screen, you have the options for filtering your results. Using this filter you can hide rows (entries) and/or columns (questions). |
 |
The applied filter affects the following options:
Results download;
Remove entries using the Delete all button;
The use of Group email and email all;
The statistics.
|
|
Learn more about using filters. |
|
|
Download results |
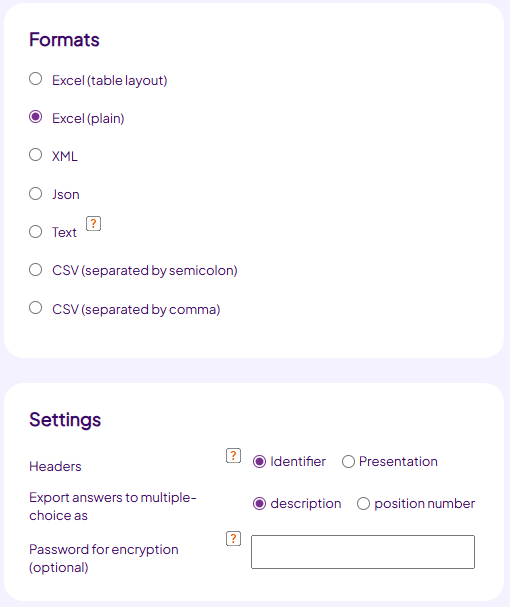
To download results click the Download button at the bottom of the Results summary screen. This will open a new window.
|
 |
|
Choose the desired file type, then click the next button. The download will now be generated and become available in a .ZIP file. Included in this file is also the legend of the download, explaining which column/ field name (identifier) belongs to which question on the form. |
|
|
Import results |
With the import functionality you can upload data from an excel sheet onto your form. Reasons for importing data could be:
1. Sending out invitations using the group email
2. Create visitors for login forms
3. Copy data from one form to another
Te learn more please go to the manual about the import function. |
|
|
Cleaning up your results |
|
In addition to manually deleting results, results can also be deleted automatically by setting retention periods. |
|
|
If you (almost) reached the maximum number of results for your subscription you can purchase extra room for results but you can also decide to cleanup your results.
There are four ways to cleanup your data to create space for further submissions: |
- To delete entries individually:
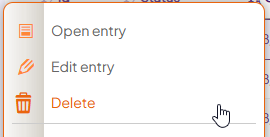
Click the button on the left of the entry that you want to delete and choose ‘Delete’ from the menu:
|
 |
- To delete all the entries:
Click the button 'Delete all' at the bottom of your screen.
|
 |
- To delete several entries:
Select multiple rows using your mouse and your shift or ctrl key just the way you would multi-select files using Windows Explorer. Click the button to the left of one of the selected entries and choose 'Delete' from the menu:
|
 |
- To delete a certain selection (e.g. all entries older than …):
Activate a filter on a keyword, an advanced filter or a pre-set filter:
|
 |
|
When the filter is active click the button 'Delete all' at the bottom of your screen to delete the entries in the filter. |
|
|
The recylce bin
Deleted results can be found in the recycle bin. Here, they can be restored or permanently deleted. Results are automatically permanently deleted after being in the recycle bin for 30 days or less if specified for the retention periods . |
|
|
|
Note: Be careful deleting results when the following options are used:
|
- When the option 'Duplicate entry validation' is used, Formdesk checks the specified rules against the results in the database. If there are no results in the database, the entry will always be approved.
- When the option 'Visitor must be able to maintain own form entries' or 'Visitor must be able to store form entries and finish later' is used, your users will not be able to open their own form when you deleted it from the database.
- If you use the Editcode within an email message, your users will not be able to open their own form when you deleted it from the database.
|
|
|
Statistics |
|
Using the 'Statistics' button you can view the statistics of the shown results that are shown. Learn more about the statistics. |
|
|
Sending an email message to your users |
You can send an email to your users in three different ways:
- Click on the email address displayed in the appropriate column. Your default email client will start with an empty message.
- Using the 'email all' button. This will open a new browser window, containing all email addresses form your (filtered) results. Copy this list into one of the address fields in a blank email message in order to send a message to your users.
- Using the Group email feature. Formdesk will send the message for you.
|
|
|
Search on Entry Id / Order number |
|
Using the Search on entry Id/Order no. button on the forms overview screen, you can search through all the forms in your account to find the corresponding form result quickly. |
|
Learn more about Entry ID and Order numbers. |
 |
|
|
Share your results |
You can share your results in two ways:
1. By creating extra users:
You can create a user for each person that must be able to view (or even edit) results. The users will then be able to login to the Formdesk account, using their own username and password, but will only be able to view the results of a specific form. Learn more about user management.
2. By publishing your results on the web:
You can publish results on the web for anyone to view. Learn more about publishing results. |
|
|
|
|
|
|
|